The file must be an image (PNG, JPG, GIF) and must not exceed 4 MB.
#### 4.2.2 Vehicles name Choose how vehicles will be displayed across the platform: - **ID**: only the vehicle identifier is displayed; - **ID (Make + Model)**: identifier with make and model in parentheses; - **ID (Matriculation)**: identifier with license plate in parentheses; - **Matriculation**: only the license plate is displayed; - **Matriculation (ID)**: license plate with identifier in parentheses; - **Matriculation (Make + Model)**: license plate with make and model in parentheses; - **Make + Model (ID)**: make and model with identifier in parentheses; - **Make + Model (Matriculation)**: make and model with license plate in parentheses; #### 4.2.3 Map List of options for trips and vehicles displayed on the map (see [2. Map](https://wiki.bizztrack.eu/books/user-guide/page/2-map "2. Map")): - Gather vehicles by group in the left sidebar; - Show the driver name; - Map full screen by default; - Hide path position points; - Label each map marker by default with time stamp; - By default, display addresses when selecting a vehicle on the map; - Hide unselected vehicles on the map; - Enable traffic info by default on the map. #### 4.2.4 Default marker Selects the default icon used to represent vehicles on the map. #### 4.2.5 Fuel prices Set the prices for diesel, petrol, LPG and electricity according to current values to calculate consumption costs in reports. #### 4.2.6 Alarms Email addresses to which alerts will be sent. Multiple addresses can be entered, separated by a semicolon (;). To receive alerts, notification permissions must be enabled. If previously denied, this can be changed via your browser settings (usually top-left near the address bar). #### 4.2.7 Report - **Trips**: defines how trips are calculated (start/end based on ignition off or first/last detected movement). - **Costs**: defines cost calculation unit (per km or per hour). This setting can also be configured per vehicle (see [4.3 Manage vehicles](#bkmrk-4.3-manage-vehicles)). #### 4.2.8 Homepage - **Homepage selection**: defines how vehicles are displayed: - as a list (vehicles, positions, statuses, etc.) - or on a map - **Sorting**: defines the display order (default, by identifier, by license plate). #### 4.2.9 Expense Management Receive an email whenever a driver adds or updates an expense. ### 4.3 Manage vehicles List of fleet vehicles. Clicking on a column header sorts the table accordingly. Data can be exported in .XLSX format. #### 4.3.1 Vehicle Profile From the vehicle list, clicking the edit icon () opens the vehicle profile with several tabs: - **Vehicle**: summary of vehicle data. The Edit button allows modification of vehicle details (license plate, consumption, costs, group, etc.); - **Maintenance**: manage maintenance, schedule or record completed maintenance (see [4.8 Manage maintenances](#bkmrk-4.8-manage-maintenan)); - **Spending**: add or view vehicle expenses (see [4.9 Manage spending](#bkmrk-4.9-manage-expenses)); - **Files**: upload/view documents (registration certificate, insurance, etc.); - **Alarms**: create alerts for the vehicle (see [4.7 Manage alarms](#bkmrk-4.7-manage-alerts)) #### 4.3.2 Batch modifications The Bulk edit button (top-right) allows applying changes to multiple vehicles at once: 1. select fields to modify; 2. enter new values; 3. select vehicles to apply changes to; 4. click **Modify** at the bottom #### 4.3.3 Groups On the right side, a list of vehicle groups is displayed. Click **Add a group** to create a new group (name + optional parent group). Groups are assigned via the vehicle profile.If a vehicle belongs to a subgroup and filtering is applied on the parent group, all vehicles in the subgroup will be displayed.
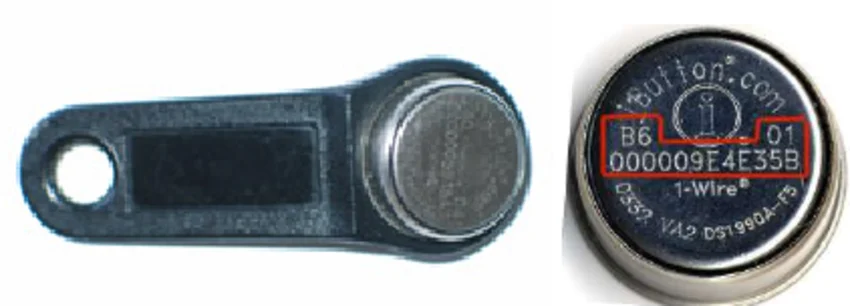
### 4.4 Manage drivers List of drivers. Available actions per driver: -  edit; -  delete; -  view files; - access calendar (see [4.4.3 Calendar](#bkmrk-4.4.3-calendar)) #### 4.4.1 Add a driver Click **Add a driver** at the top of the list and fill in the required fields.If vehicles are equipped with driver identification, the **Key code** must be entered correctly using the value found on the chip. The code consists of 16 characters (0–9 and A–F). The first two characters are located at the top-left of the sequence, and the last two at the top-right. Example: B6000009E4E35B01
 #### 4.4.2 Driver profile Accessed via the edit icon (): - **Driver**: summary of driver details. The **Edit** button opens the same form as creation; - **Reminders**: create/view reminders; - **Spending**: manage driver-related expenses (with file/photo upload); - **Files**: manage driver documents (license, ID, etc.). #### 4.4.3 Calendar Displays driver unavailability. From the right panel: - filter by driver - add events - edit absence types Clicking an event allows editing, deletion, or export to Google/Outlook calendars. ### 4.5 Manage Beacons (optional) - To add a beacon, contact support:Avoid making zones too small, otherwise vehicles may not be detected within them.
- Optional: zone coordinates. - Import zones: via .CSV, per category; - Create category: define a new category; - Zones can be filtered by category. ### 4.7 Manage alarms Alerts can be configured at three levels: - fleet - vehicle group - individual vehicle Click the Manage alerts icon () to view or add alerts. #### 4.7.1 Edit alarm - **Sending**: - **Trigger every time**: overrides default once-per-day behavior; - **Email address**: overrides global email settings for this alarm - **Days of the week**: limit activation days - **Fixed period**: define alert validity period Alarms can also be copied/transferred between vehicles. #### 4.7.2 Add an alarm Configure parameters (zone, time, etc.) and click **Add**.Notifications and/or email must be enabled to receive alarms (see [4.2.6 Alarms](#bkmrk-4.2.6-alarms)).
### 4.8 Manage maintenances #### 4.8.1 Plan a maintenance Fill in fields to receive alerts for upcoming maintenance (inspection, servicing, tires, etc.). At least one of the following must be set: - date - mileage - usage time If multiple thresholds are set, the first reached will trigger the alert. Repeat option triggers recurring alerts. Alerts are sent via email (see [4.2.6 Alarms](#bkmrk-4.2.6-alarms)). #### 4.8.2 Add a maintenance Two options: -  via scheduled maintenance - manually via **Add a maintenance** Option to automatically create an expense entry. #### 4.8.3 Categories Default categories: - inspection - maintenance - tires - other Custom categories can be added. ### 4.9 Manage spending Add and track expenses for vehicles or drivers. Fields include: - vehicle - amount - date - description Filtering available (group, vehicle, driver, period). Categories can be created. Export available in .PDF, .XLSX and .CSV formats. ### 4.10 Scheduled reports Receive reports by email at a defined frequency. Configure: - report type (see [3. Reports](https://wiki.bizztrack.eu/books/user-guide/page/3-reports "3. Reports")) - frequency - format - recipients ### 4.11 Manage guest accounts Create a new platform access. Configure: - user details - expiration date - accessible groups - accessible vehicles - permissionsIf no vehicle or group is selected, access will be granted to all vehicles.
# 5. TachoSync If your trucks are equipped with one of our devices with tachograph reading functionality, you should normally have received an invitation to the TachoSync platform, which allows you to schedule and download the DDD files of your trucks and drivers. ### 5.1 Add your company card If you have not already done so, the first and essential step is to add your company card to the platform. Start by downloading the card reader software. To do so, go to **Settings** in the top-right corner, then select **Company Card Authenticator**. In the window that opens, click the **Download** button for the latest available version. Once downloaded, run the file and proceed with the installation.If you previously used **Web Tacho**, you must first uninstall the **Remote Card Reader Monitoring** software from your computer.
Next, connect your company card to your computer using a USB card reader. In the Company Card Authenticator application, you should see a card number. Copy it. In the menu on the left, click **Companies**. Then click the name of your company in the list. A panel will open on the right. Scroll down to **Company Card** and click the **+ Add new item** button. In the **Company Card Identifier** field, paste the identifier you obtained from the software. # 6. Tachographs (Tacho+) ### 6.1. Overview #### 6.1.1. Overview: Provides a summary of the information relating to vehicles in the fleet that are equipped with a tachograph: - Number of vehicles equipped with a tachograph (see [6.2. Vehicles](#bkmrk-6.2.-vehicles)); - Number of vehicles equipped with a tachograph that are currently on the road (see [6.2. Vehicles](#bkmrk-6.2.-vehicles)); - Driver cards: all drivers using a vehicle equipped with a tachograph (see [6.3. Drivers](#bkmrk-6.3.-drivers)); - Drivers at work: number of drivers currently active (driving, working, etc.) (see [6.3. Drivers](#bkmrk-6.3.-drivers)); - Company card expiry date (see [6.4. Infringements](#bkmrk-6.4.-infringements)). #### 6.1.2. Graphical display: - Vehicle activity: chart showing the number of active and inactive vehicles; - Driver activity: chart showing the number of active and inactive drivers; - Vehicle status: chart showing the number of vehicles according to their driver's status; - Tachograph calibration: indicates when a tachograph calibration expiry date is approaching; - Vehicle DDD downloads: status of vehicle DDD file downloads; - Driver DDD downloads: status of driver DDD file downloads. #### 6.1.3. Infringement timeline - Chart showing the number of infringements recorded per day over the last 15 days. #### 6.1.4. Quick actions - Close all infringements: allows you to archive all infringements currently being viewed. To view and manage infringements individually, see [6.4. Infringements](#bkmrk-6.4.-infringements); - Disable all notifications: allows you to stop all notifications. To manage notifications individually, see [6.5. Notification management](#bkmrk-6.5.-notification-ma). ### 6.2. Vehicles Allows you to view the list of vehicles equipped with a tachograph. The following information is available for each vehicle: - Vehicle status: parked or moving (when hovering over the icon, the vehicle speed is displayed); - Vehicle: vehicle name. By clicking on the name, you can display various information about the vehicle (position, status, last driver, etc.), display it on the map and view the speeds recorded during its various trips throughout the day; - Last identified driver; - Driver card status (inserted, not inserted); - Driver status: driving, working, etc.; - Date of the next tachograph calibration; - Daily report: redirects to the vehicle's daily report (see [3.2.1. Daily report by vehicle](https://wiki.bizztrack.eu/books/user-guide/page/3-reports#bkmrk-3.2.1-daily-report-f)); - View vehicle details: by clicking on the icon, you can display various information about the vehicle (position, status, last driver, etc.), display it on the map, view the speeds recorded during its various trips throughout the day and view infringements relating to this vehicle. You can search for a vehicle by entering its name or the first few letters of its name in the search field. You can also sort vehicles by name, status, speed or calibration date by selecting the desired sorting option from the Sort menu. ### 6.3. Drivers List of drivers. You can search for a driver by entering the driver's name or the first few letters of the name in the search field. You can also sort drivers by name, status, time remaining until the next rest period, remaining shift time or remaining weekly time by selecting the desired sorting option from the Sort menu. Each driver row displays the following information: - Status; - Driver name; - Vehicle currently being used by the driver; - Remaining hours for the current week; - Driver daily report; - View driver details. By clicking on the icon, all information relating to the driver is displayed: - Name; - Card number (on the right); - Status: driving, working, etc.; - Driving time for the day; - Driving time for the week; - Driving time for the week. The driver's working hours are displayed as an overall summary: - Time until the next break; - Remaining hours for the current week; - Remaining hours for the current two-week period; - Daily limit exceeded this week. Activity during the day: displayed graphically, allowing you to see the periods assigned to work, driving and rest throughout the day. Above the chart, on the right-hand side, you can quickly change the date to view this information for another day by using the calendar menu. DDD files ### 6.4. Infringements You can view and filter infringements: - By vehicle: "Filter by vehicle" menu on the right; - By driver: "Filter by driver" menu on the right; - By infringement: "Search for an infringement" field on the right. #### 6.4.1. Open infringements List of infringements relating to vehicles. Each infringement includes: - Date, time and vehicle; - The option to add a comment; - Incident details: click +. #### 6.4.2. Archiving infringements You can archive an infringement by clicking on the icon. If the "Advanced infringement management with 'In progress' status" setting is enabled, additional options become available: View details / set to "In progress", set to "Closed" (see [6.7.3. Infringement settings](#bkmrk-6.7.3.-infringement-)). #### 6.4.3. Archived infringements Archived infringements can be found in this tab. ### 6.5. Notification management #### 6.5.1. Notification management - You can configure which notifications you wish to receive and the email address(es) to which these notifications should be sent. This configuration can be managed in the "Notification configuration" menu; - If no email address is provided, notifications will be sent to the default email address. The default email address can be entered at the top of the "Notification management" page. #### 6.5.2. Notification configuration List of available notifications: - Notify when speeding occurs; - Notify when the maximum working time without a break is exceeded (4h30 without a break); - Notify when the daily working time is exceeded (9h/day); - Notify when the weekly working time is exceeded (56h/week); - Notify when the working time over two weeks is exceeded (90h/2 weeks); - Notify when the company card expires; - Notify when a vehicle is driving without a card inserted; - Notify when a vehicle is driving with an inserted but unrecognised card; - Notify when a vehicle or driver card has not downloaded data recently; - Notify when a driver card is about to expire; - Notify when the company card has been disconnected for more than 7 days; - Send a weekly report of infringements recorded by the tachograph; - Notify when the tachograph calibration date is less than 15 days away. To activate a notification, enter the recipient's email address and enable the notification by clicking the button on the right. If no email address is provided but the notification is enabled, the default email address (see above) will be notified. #### 6.5.3. Automatic creation of infringements Whenever an enabled notification is triggered, an infringement will automatically be created (see [6.4. Infringements](#bkmrk-6.4.-infringements)). Once the desired notifications have been enabled and the email addresses have been entered, make sure to save the changes by clicking the "Save" button at the top or bottom of the notification configuration menu. ### 6.6. Reports Allows you to create an activity report by vehicle or by driver for the selected period. To generate a report, select either the vehicle from the drop-down menu OR the driver from the drop-down menu, select the desired period in the "From" and "To" calendar fields, then click "View report". The report generated by vehicle contains the following information: - Total rest; - Total availability; - Total work; - Total driving; - Further down, a detailed breakdown by day and hour of each status (rest, work, driving). This information can be exported in .PDF, .XLSX and .CSV formats. You can quickly change the report criteria by clicking "Edit" at the top of the report. You can then change the vehicle and the period. The report generated by driver contains the following information: - Total rest; - Total availability; - Total work; - Total driving. This information can be exported in .PDF, .XLSX and .CSV formats. You can quickly change the report criteria by clicking "Edit" at the top of the report. You can then change the driver and the period. Please note that the driver report is never available for the current day. ### 6.7. Configuration #### 6.7.1. General settings Allows you to select which information should be displayed on the start page. In the menu on the right, you can choose from four different start page options: - Overview: all information relating to all vehicles equipped with tachographs, all drivers and all infringements; - Vehicles: all information relating to all vehicles equipped with tachographs; - Drivers: all information relating to all drivers; - Infringements: all information relating to all infringements. Please note that you must click the "Save" button to apply the changes. #### 6.7.2. Overview settings - Display key indicators in the overview: displays the key indicators at the top of the "Tachographs" start page: number of vehicles equipped with a tachograph, number of vehicles currently on the road, number of driver cards, number of drivers at work, company card expiry date and number of unresolved infringements; - Display charts in the overview: displays the charts at the top of the "Tachographs" start page: vehicle activity, driver activity, vehicle status, tachograph calibrations, vehicle DDD downloads and driver DDD downloads. Please note that you must click the "Save" button to apply the changes. #### 6.7.3. Infringement settings Advanced management of infringements with the "In progress" status: once enabled, this setting displays additional icons on each infringement row: - Set to "In progress"; - Set to "Closed". #### 6.7.4. Report settings XLSX exports without detailed activities: reduces the size of reports exported in Excel format by excluding the list of status changes.